Showing posts with label Bunnings. Show all posts

Sunday, October 26, 2014

Emali Early Learning Centre/Recycling Part 4

Hi All,

I've decided to do my next Recycling piece on a local childcare center which my wife, Justine, works at.

They are a big believer of re-using unwanted goods and teaching the kids the value of recycling as opposed to buying something new. Over the course of this article I'll show the ideas they have put added to the centre - due to child protection though I won't be able to show any children in the photos.

So, the centre is called Emali Early Learning Centre which is based out at Broadview, South Australia. The centre is only about a year and a bit old but the staff in charge are extremely experienced and excellent to deal with.

Since my wife has worked there we've had discussions with the Manager, Rachael, about the value and fantastic things you can do with items such as unused Timber Pallets. Now the centre is not only creating new things with Pallets but they have shifted their focus to anything else they can lay their hands on to create new and exciting ideas.


The first photo I just love, and it isn't hard, or cost a heap to do. It's perfect for centre's or even at home!

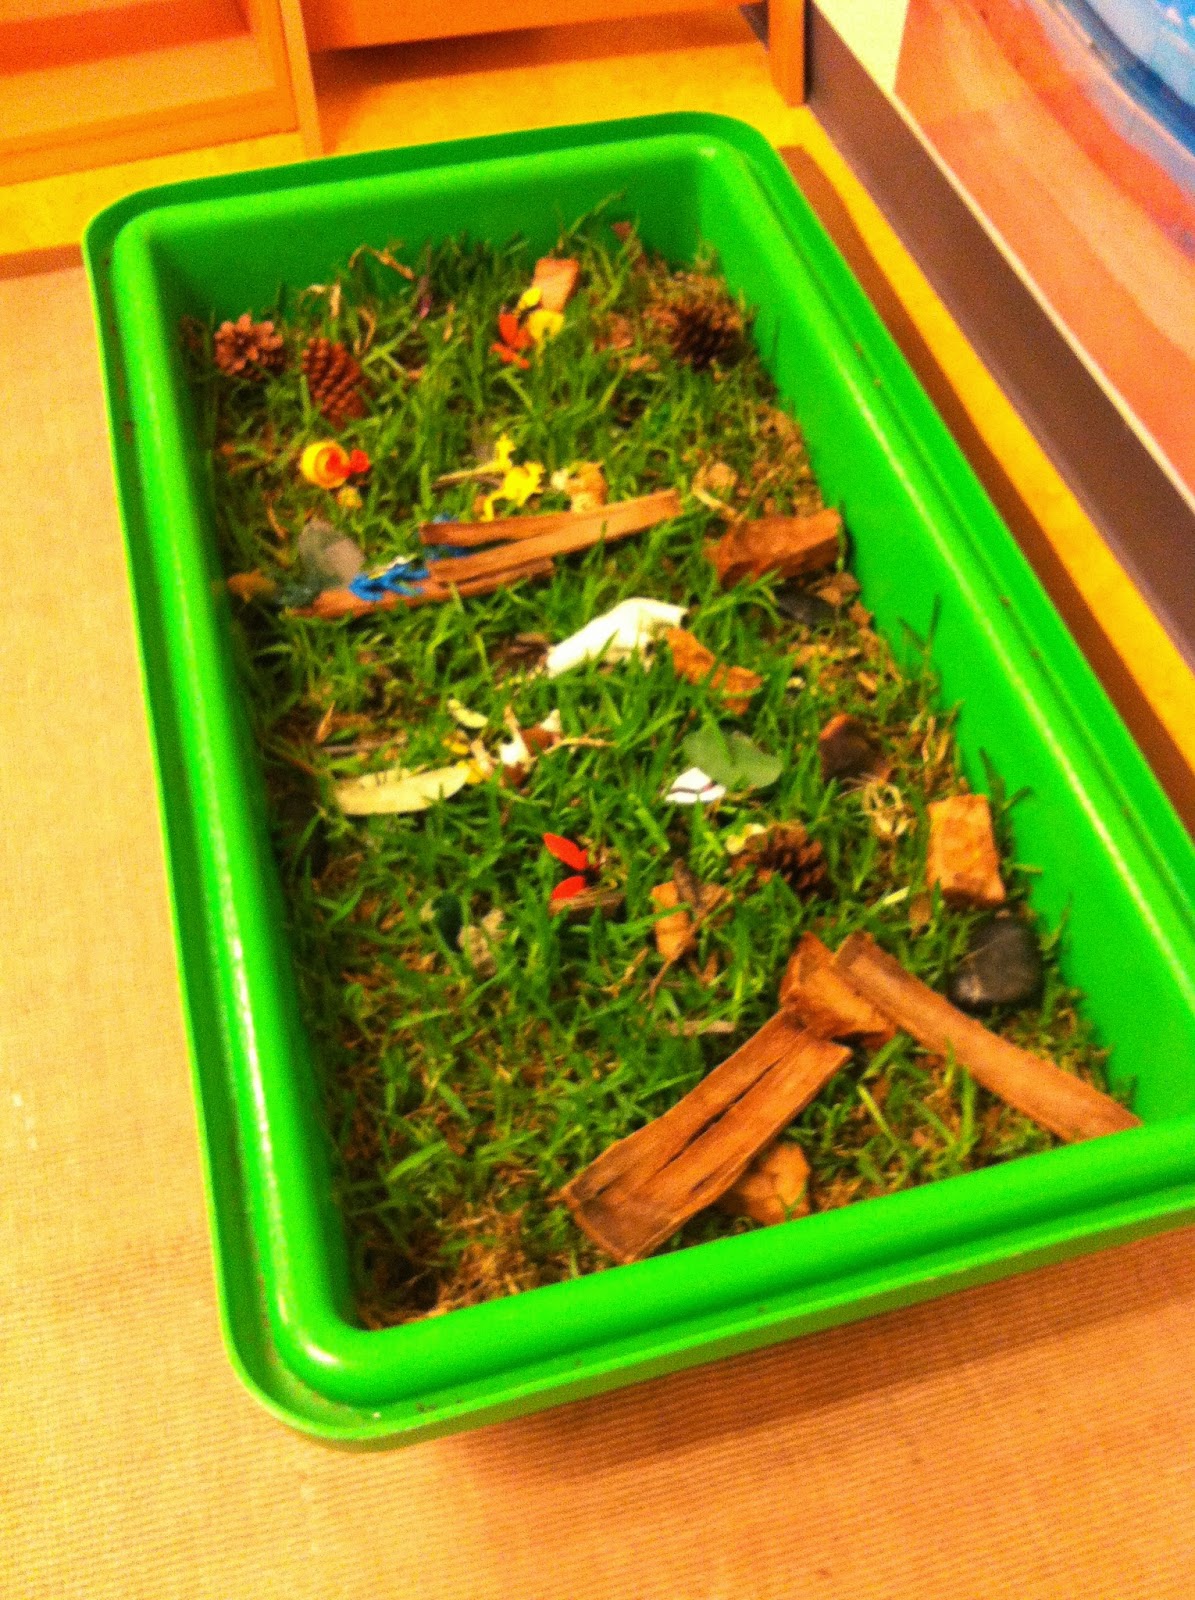
This is a simple plastic container bought from anywhere like a cheap shop like Cheap as Chips, Reject Shop or even from Bunnings. Buy the longer one that is still relatively deep but with some soil added and the grass the kids can just reach in and play.

The centre basically bought the container, added a good two inches of soil and then bought a patch of grass from Bunnings. They're selling it there at the moment for approx $7 - $10 per patch.

The idea is basic, cost effective and brilliant, it can be used while its bucketing down during winter or too hot to go outside. It teaches the kids about the environment, gets their hands dirty and good thing - they can grab some scissors - cut off as much as they like and it will grow back! Brilliant!!


 Now onto a pallet theme, I love pallets!

This centre is excellent for pallets as they too see there is still life in the old work horse even after its spent years holding stuff like bricks, pavers and other heavy items - yet often to be left discarded on the side of a road!

We love nothing better than picking them up, sanding them back, fixing them up then applying some varnish to give them a new look.

Here's some examples of the pallet work the centre have added as well as some i've helped do. This one to our right is simple - can be used as a table, somewhere to sit or play on yet looks very loved and used alot by the kids!


Here's another example similar to the above photo however for this one, Rachael tidied this one up alot more giving it sides and legs!

This one has come up very nicely and tall enough for the kids to sit with their legs under and punch out some excellent art-work!


This one is simple yet effective, pallets and other recycled items have been thrown together to create an "Insect Hotel"!!

Here the kids can explore and learn about all the bugs our gardens have to offer - on top the centre has also included plants for them to help water!


As I move to the next ideas, Tyres, you'll see in the background some pallets we've bolted to the fence to add extra garden spots for the children to help plant with and water.

Here you can see different sizes and length pallets have been used

You can also see in the left hand side of the photo a "Pallet Boat", nothing major but Rachael added a sail to the base - the kids love it and spend hours pretending their sailing the seven seas!


Tyres, every childcare centre loves them (And if they don't they should!!!) I remember growing up in O'Halloran Hill where our Kindergarten had big massive Tractor Tyres, I used to love playing in them!

Rachael found an advert on Gumtree where someone was giving Truck tyres away for free, a quick phone call and within days the centre had approx 20 tyres of different sizes delivered.

Here you can see they've been added around the centre for the kids to climb, explore or simply sit and have a chat!

The kids can paint or draw on them!


Here a tyre has been added just in front of one of the pallet gardens, children can sit here and have a chat or sit and help plant!


Here's one my talented wife, Justine, came up with, she took some off cuts of pipe laying around in the shed and secured these to the pallet.


Too often these days the world ignores those things which die off yet when given a new life can be used to create wonderful things.

This hanging decoration is just that, using an old metal ring, some string and sticks the centre has created quite an interesting hanging piece.

You can't see in the picture but they have also tied pebbles and glass pebbles with fishing wire for added effect.


I'm extremely proud of this creation, my lovely wife Justine on a recent trek up the Riesling Trail in the Clare Valley collected these large sticks to create a fun and inviting wall decoration outside her children's room.

Using fishing wire and lots of coloured pebbles she as included individual photos of the kids for their parents to see!


The next couple of photos highlight other items businesses take for granted and throw away after use.

These big wheels are normally used for industrial items like wire. I'm not sure of their life expectancy but for kindergartens and child care centres they live on for many decades, the kids love playing on them, climbing etc.

Here just simple, its new use is a table, thrown together with some cut tree logs.

Below are a few more examples, wood or plastic - either will make a great table for the kids to use, rather than spending $100 on a new one!


So this brings me to the end of Part 3 of my Recycling article, I hope the above gives you some ideas for things you can do at home or even at a centre you work at.

It doesn't matter what the item is, there is usually a new home for it. Let your mind think outside the comfort zone and help teach the kids of today that life isn't just brand new things bought from Ikea and local stores. Recycling helps not only the environment but also the youth remember that reducing our carbon footprint will help generation after generation.

Emali Broadview are apart of a new trend of centers with Managers/Directors who are on the look out for this type of Recycling, its fun to do, easy to make and all centers and schools should think of doing this regularly. For more information on Emali you can go to: http://www.emali.com.au/childcare-broadview.html.

Finally it must be noted the work Justine & Rachael do at the centre, on top of their very busy schedules and juggling a very busy centre - they have transformed their ideas from dream to reality and the children are benefiting from this. A very valuable partnership they have and I look forward to watching what else they come up with!!

I'll leave you now with some more examples below of items the centre have either collected or set up and used.

Regards

Tony
Pallet turned Bookshelf!
Wood off-cuts sanded back to now be used as building blocks!
The Storage Area!


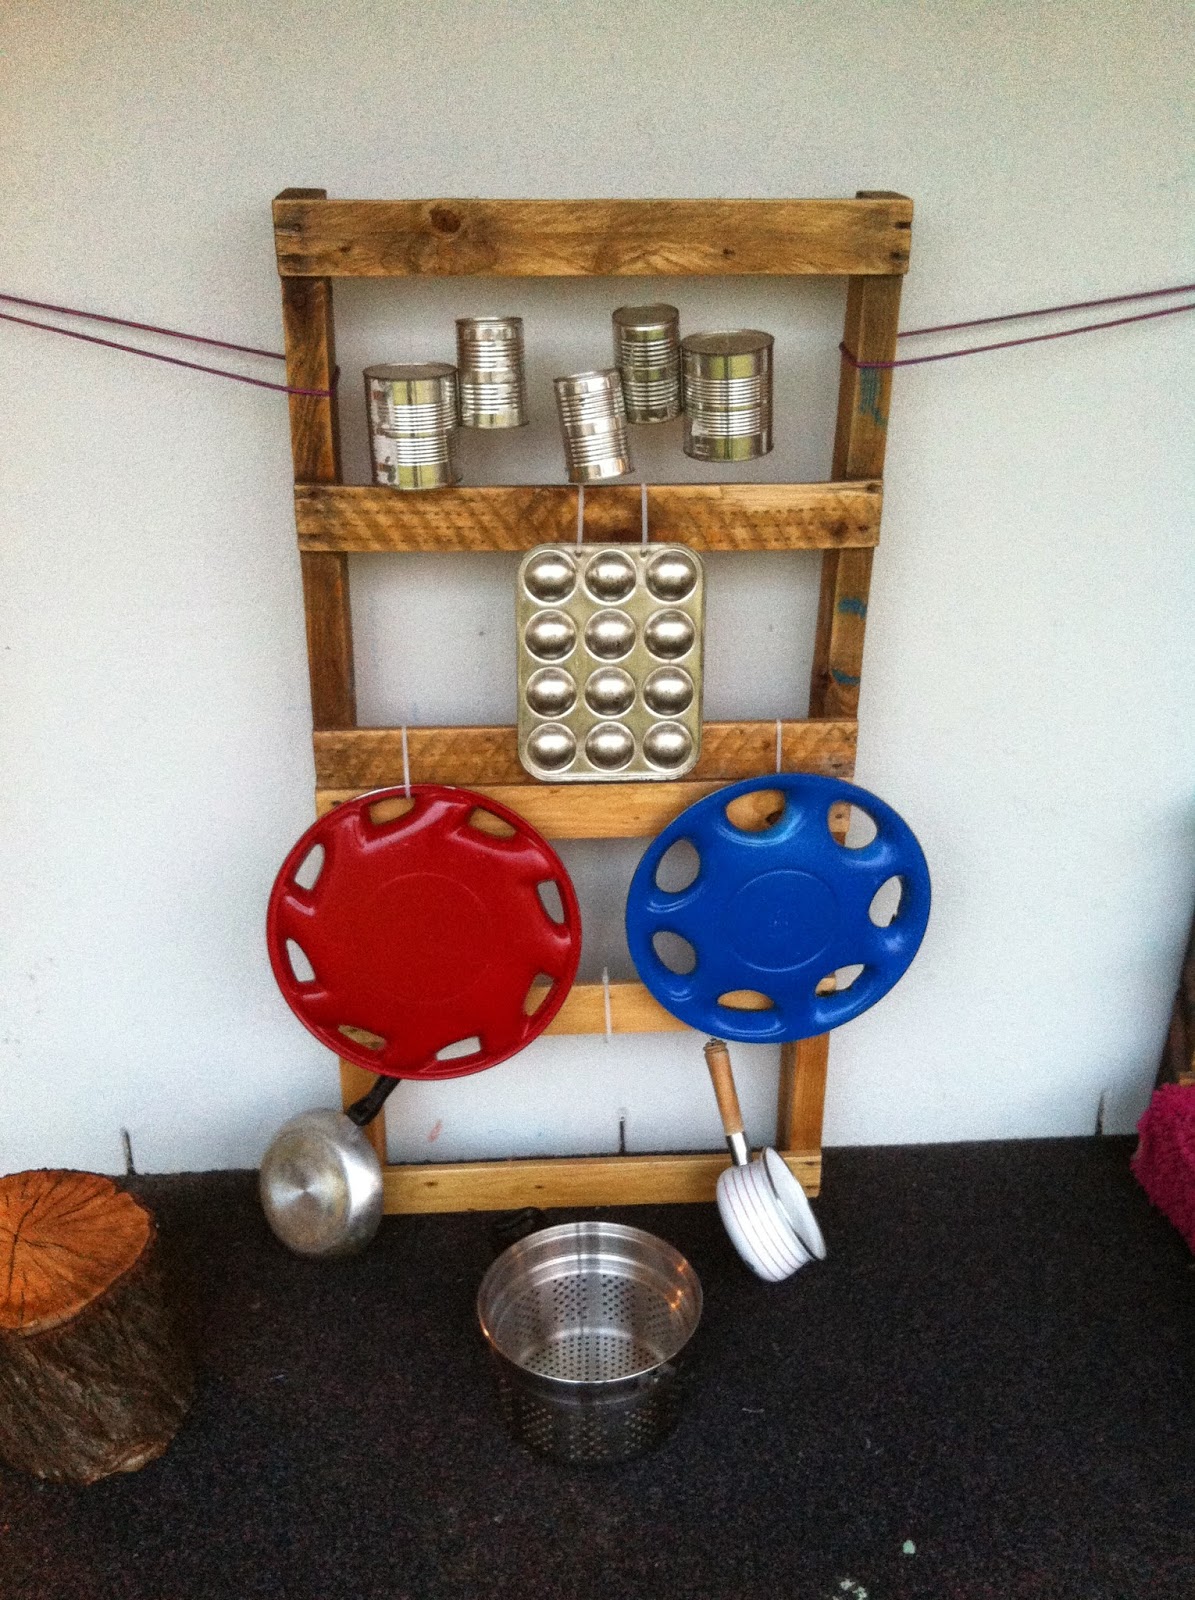
Pallet turned Music Wall!


New Planter Boxes!

Nice area for a quick nap or relax

Sunday, August 3, 2014

Recycling Part 3


Hi All,

Been a while since my last post, sport and work seem to have taken up alot of my time of late.

Last weekend was the first "At Home" one we've had in some time, I wanted to make sure I didn't fall into the old ways of lazy weekend at home so let's jump on the PlayStation.

My wife and her child care centre are really getting behind the concept of building stuff with recycled materials such as timber pallets, so she asked if I wouldn't mind chopping up one of the pallets to be varnished and re-used as book shelving.

No worries at all! This helped me re-discover my old circular saw which has been hidden away for some time - I was delighted to find it still works beautifully! Out of the one pallet you can make 2 shelves, however there is enough left over for you to almost make a third, if you do attempt this it's good if you have a couple of pallets being used for the main task then one or two sitting by for spare parts... I chopped the two and a third up and sanded them down with my orbital sander.

My wife then applied the varnish (2 coats) and they look a million dollars!


Whilst sitting by my bench my wife also noticed a heap of scrap wood which was collecting saw dust, she asked if I could cut it all into different sizes for the kids at her centre to build with. Genius! Why didn't I think of that! So I cut down a heap, I think in total there was about 40 - 50 blocks but enough to fill this lovely bucket. I took the bucket full of cuts with some sandpaper and sanded down all the edges and the sides cut to make sure no nasty splinters for the kids.

Word is they received the bucket today and absolutely love it!


Our next project was to liven up the scrap pile which was semi-made for the chickens to get in, pick about the scraps and help turn a patch of soil into a lushish worm filled plot to be used for a veggie patch or for spare soil.

In one of the big storms we had late last year we lost our timber pergola out back, the storms were quite savage and as such knocked a tree branch right through one of the main parts, Being unable to fix I decided to pull it down and salvage the parts.


I went around to the local Bunnings and bought some metal rods the guys use when laying concrete, drilled a hole at each end of the timber poles and knocked the rod through to secure. That easy, and the best thing, we're utilizing recycled materials.

I then asked my lovely children to each give me a hand and we dug up the plot, turned it all over and planted Potatoes, Parsley, Celery, Brown & Red Onions and Carrots. Not art work but it at least makes this part look a tiny bit better.


Last but not least is an idea I've been keen to try for some time, the Potato Tower!! Using old wood in the shed and poles left over from the pergola I wanted to create the tower to plant potatoes. The theory I've read online is to start them low in the tower, let them grow up, then add more soil as the plant gets tall.


By adding extra soil the plant then generates more potatoes. As this occurs I keep adding extra lines of the wood - thus creating a big tower filled with potatoes!! Here's a photo of the finished product, as you can see I've added two panels at the bottom and one about three up from there - just to provide a bit of stability to the frame.


It is truly amazing the things you can do when you open your mind to the world around, here's a couple of things my wife's child care has done recently.

Here in Adelaide its quite cold and wet whilst we're in the middle of Winter, so the childcare centre brought the lawn inside!!!

My wifes boss at Emali Child Care Centre (Broadview) created this gem by simply getting a container, then heading to Bunnings and buying a strip of pre-grown grass they have turned a boring old container into something the kids can play with and explore their senses by allowing them to touch and feel but also grab the old scissors out and trim it - best thing is, with a bit of water and the kids grooming, it continue to grows!


This probably isn't as exciting as the above but for me, I love it!

This once was an empty section of the room which has now been transformed into somewhere the kids can sit and play/draw, they've converted an old wheel that once held wire/cable and they've also added old tree stumps as chairs! Sanded down so no splinters this gives a lovely new area to sit and chat.


Good Luck and I hope some of you get a chance to try something like above or gain inspiration for recycling items for re-use rather than shoving into the waste!

Regards

Tony

Tuesday, January 21, 2014

Recycling Ideas Part 2

Hi All,

Welcome to Part 2 of my recycling ideas, as I mentioned before some are my ideas and some are "borrowed", here is one I came up with and just finished!

In the past 6 months or so i've loved the idea and keenly watched new and impressive ideas for using old timber pallets, as you would have seen on an older article I, with the help of my children, turned an old timber pallet into a garden feature.

Sadly a week of over 40 degree days killed my plants in there but once we get over the heat I'm going to replant this with fresh plants!

The new idea was to turn one of the timber pallets which had a flat plywood top into a mini table on wheels with the top turned into a chalkboard!


So, we found these pallets at the local carpet shop. I bought a new orbital sander and thought this would be perfect to test out on.

I gave the whole pallet a good sanding with some grade 60 sand paper, curved off all the edges and removed any splinter causing areas.

Adding castor wheels at the bottom gives the ability to move it around easier, these ones also have brakes so if you don't want it to be moved or children moving it while using it just flick it into lock.

This design was made purely to be placed in a child care centre, I wanted to come up with something that children could easily sit at and play, or put their legs under if they want.


I was able to buy a litre of black chalkboard paint from our local Bunnings for approx $15, I applied two coats to the top and has come up a treat!

For the sides and bottoms we decided to go with left over Pink paint the centre had left over, as their main colour for the centre is Pink we thought this would be fitting. The paint left over was a high gloss which was previously used on the doors, two coats of this and the pink really came out nice and shiny.

That's it, as simple as that. Now, not all pallets come with a plywood top, these are rare so if you see one grab it! If not Plywood isn't that expensive so if you find a good pallet you can easily fit a plywood top to it for added height.

Now the finishing product, Personally I'm really happy with the way this came out and reckon it looks awesome, from all reports the kids loved using it also with big chunky pieces of chalk! For child safety reasons I'm not allowed to show the kids using it but heres a photo of the finished product.

This is also easy enough to enlist the help of your kids just get them to wear some gloves until after the pallet has been fully sanded, choose a colour or multiple colours and paint away! The blackboard paint also comes as a green also.

Please try this at home, took me a couple of nights to do and all you need is the pallet, castor wheels, sander (my orbital worked really well), Chalkboard Paint and another Paint for the sides and bottom.


Saturday, August 17, 2013

Sustainability & Recycling Ideas

Hi All,

Well recently I started looking at different ways our family can work with the environment rather than always buying new things to use!
I stumbled upon this website while surfing via Facebook: http://lifeonthebalcony.com/how-to-turn-a-pallet-into-a-garden/

The owner of the site, Fern, shows some really interesting ideas for re-using items as simple as an old timber pallet and turning it into a real garden feature!

Please check her website out as I can take no credit for this idea, this article is more so to bring awareness to the idea and demonstrate how my family and I created our pallet!

Heres a list of things you'll need to get your pallet going:

1 Timber Pallet
1 Roll of Weed Matt
1 Roll of Sandpaper (Medium course)
1 Staple Gun with plenty of staples
5 Bags of 25L soil
10 - 15 punnets of plants


So, Step 1 is basically get your hands on a timber pallet, there are usually heaps lying around in nearly every suburb you drive through. I noticed this morning nearly all businesses have a pile out the back and you will also find one or two out the front of houses if someone has recently renovated...


Try and find a nice one but if possible one which has thinner wood than most heavy duty ones, you'll thank me later as the weight of these once soil added is huge!


Step 2, once you've lugged it home you need to nicen it up a bit with a solid sanding, my view on this one was the idea that little children can be involved so try and round off the edges, sand back any bits sticking out that could give off some nasty splinters and fix up any big bits that have come off.


Step 3, this bits easier, take out the weed matt and place it over the pallet, have enough extra on the sides as this can either be doubled up or trimmed off later. For extra durabilty we decided to double ours up on the edges just to make sure.

Once you've stapled them in, just run over all the staples with a hammer to make sure they're all in fully!


Step 4, lay down the pallet and proceed to add fill with soil, remember you need to make sure you pack soil at the bottom and top of each railing, pack it in really tight once plants are added to ensure the soil doesn't all drop out.


Step 5, the fun part! With the soil already added part the middle of each row to create a channel for you to add the plants, for ours, we managed to get our hands on super cheap punnets of flowers for only $1.50 each so we ended up buying 24 of them which helped give it an already established look.


Step 6, once the plants have been added now pay particular attention to filling the gaps up with soil, with a spare mini bucket add clumps of soil around the outside and inbetween plants and press it in firmly - this will help ensure that the plants and soil don't dislodge when you stand it up.


Step 7, give your new plants/pallet garden a thorough drenching! New plants love a big drink once they've been added to new soil and new surroundings so fill the water container up 3 or 4 times and drench it!


Now Step 8 is really up to you when you do it, stand up your pallet and attach to wall via bolts/brackets if thats how you intend to use it.

Myself, and I believe Fern via her website did also, couldn't resist and stood ours up not long after the drenching - I was too eager to see how it looks..

Must say, the sheer weight of my pallet was immense and I struggled to move it against our shed! So make sure you have two people to move the pallet and help you secure it.

I found this to be a really enjoyable little venture, it was fun to do and the kids loved helping too! This is a really family friendly thing you can do, it not only gets the kids outdoors and active but teaches them to think outside the square and see what you can create out of items which are usually discarded!

My boy Noah helped me throughout the whole process, my younger daughter Mia more so got involved with the planting side. I think this is a great venture schools and childcare centres should look to adopt, my only concern with it is the weight, so if anyone out there is considering doing this please make careful consideration to how you will use it after its finished. If its to be a feature against a wall standing up you must look at bolting it or some other way to ensure this can't fall over - the sheer weight would seriously harm a child or kill them if it landed on them! I'm definately no expert in this side of things so would consult a tradey or even pop down to your local Bunnings as i'm sure their team of experts will guide you!

Mine is placed nicely on a slant, my kids are big enough now to know not to climb or pull it over however I wouldn't recommend every do this if kids under the age of 6 are present..

With that in mind I still think this is a great, fun, environmentally friendly venture anyone can do! The pallet can be loaded with your favourite plants, or, whack a heap of herbs and veggies in there to grow fresh consumables!


Here's a list of the plants I used in the trenches:

Pansy
  • Pussycat
  • Masterpiece
  • Caribbean Sunrise
  • Priscilla
  • Breaking Dawn
Viola
  • Space Crystals
  • Harbour Lights
  • Babyface

Dianthus - Gemfire

Once it was stood up and against the shed I originally just had some potts sitting on the top as I was experiencing soil loss on the top level, I found some gutter mesh I had left over in the shed so added that to see if this would stop the soil running and dropping out - worked a treat!

So with the soil now sitting nicely I added some Brussel Sprouts, Snow Pea and a couple of other small flowering plants (Can't remember their names...). With any luck we will get some yummy sprouts!

The first pallet cost me approx $60 but some of the items such as Weed Matt, Sandpaper and Staple gun can be used for multiple pallets - i'm hoping to get around 3 more pallets out of the initial purchase.

Give it a go and please share your experience and if you rate this as a good venture to do or get your children involved with! The beauty of the pallet transformation is you don't have to stand it up! This can also be used as a new veggie patch laying down instead of digging out one and fencing it off!

Friday, September 21, 2012

Adelaide - Is it the place to be?

Adelaide, the old sleepy town where nothing really much happens..

This is the saying alot refer to when they think of Adelaide, most of them would be true but alot miss its inner workings and stuff that make us Adelaideians proud to live in this state.

Yes we don't have theme parks like the Gold Coast and major attractions like Sydney's Opera House and Melbournes MCG but geez, where else in Australia can you live 5 minutes from the city and not be surrounded by a concrete jungle?


Jim Barry Wines - Armagh


Theres alot to love about Adelaide, for me the fact I live 5 minutes from the city and was able to afford it without paying a million dollars for it. Where a Sydneysider would travel an hour and a half to just get to work I can instead travel to one of the best Wine Regions in Australia, The Clare Valley.


Pikes Winery - Clare Valley

I liken Adelaide more so to that of a Sleeping Giant, if you look across the city skyline, infact across alot of the state, you will see a bevy of cranes and construction happening. We have a new state of the art hospital being built, Our famous Adelaide Oval is getting a huge revamp to house AFL football and hopefully some Soccer World Cup games... Progress is happening, soon Adelaide will burst out as a major player in the country.


Areas like where i live are also seeing a whole new lease of life, down the road from me is the train yards, forever a ghost area, it is now a given life again with the introduction of a Bunnings. There is also plans in place to add a new Coles and a K-Mart which is sure to bring in massive business.


Bunnings - Prospect
The introduction of Bunnings is a huge step, really its one of the best shops around and has so much to do. Every weekend i visit there, even if we don't need anything i'll still go to check out plants. I always take my 5 year old who loves tagging along now as every Saturday & Sunday the good folk at Bunnings hold stuff for the kids to do.

Last weekend my little angel came home with a decorated pot base that you can put mozzie repelling candles in - a few weeks before my eldest came with me and made his mum a decorated pot and planted a daisy in there for her.


The introduction of a Kmart and possibly some more little shops will boom this part of town, more jobs, more products to choose from!

Don't get me wrong, I'm not saying the other states aren't great cos thats furtherest from the truth. Gold Coast for example, I would move there in a heart beat, unfortunately the cost and my worry about finding work in the finance industry there has alot to do with us moving up there.

Melbourne is another place I really want to move to, that way, I can see 15+ Richmond games each year instead of the 3 I see only when they play in Adelaide twice and I fly over for a game... But for me Melbourne not as affordable close to the city like I am here in Adelaide, so I'd need to be prepared to travel alot into the city for work.

Travel time is a big factor for me as I have young children aged 5 & 8, I want to spend as much time as I can with them before they grow up and don't want to "hang" with their parents anymore..

One thing I do love is when I catch the bus each day and heading into town, the River Torrens as you cross the bridge is one of the most picturesque in the country. Its the sort of area you could sit and truly relax, block out all of the sounds around you and take in the beauty.

I love participating in the annual Corporate Cup, I'm no runner, nor am I a fitness guru but i'm trying my best... One of the attractions of the cup is the venue, each year we run around the River Torrens.

Recently it helped me capture some of the most beautiful photo's i've taken when a fog which was covering the north eastern side of the city moved over the river and engulfed us with white magic!


But when it comes down to it, affordability is one of the biggest cards Adelaide can offer (besides its beautiful scenery, wineries etc.) Just North of the city you can get yourself a bargain house for just over $500k, drive another 5 minutes North and the price lowers to anywhere between $400k & $500k.

It is also full of older areas which are in the process of being redeveloped, there you can pick up House & Land Packages for $300k - $500k.


So, you can call it what you want but most will agree Adelaide is a fantastic place to live and raise a family!